Chat in the editor · Beginner · 45:13
Redraw a printed floor plan with AsbestoPlan Chat
British male AI narration · English captions · Fictional demonstration project
A real, step-by-step editor walkthrough: upload an anonymised printed plan, calibrate a known measurement, create an editable draft, request rooms and openings, add illustrative equipment and routes, and review corrections in 2D and 3D. Includes actual replies, retained processing waits, a matching equipment key and clearly explained limitations.
Before you start: Use a practice project and a plan you are permitted to upload. The traced wall geometry remains a draft: printed reference values do not verify modelled dimensions. Check room relationships and openings, crossing routes, and the unconnected illustrative panels, sheeting and access units before relying on the drawing.
Try a fictional practice drawing
Explore the editor with your own practice project. Free Preview needs no card and includes two saved projects and watermarked exports.
Tutorial resources
Supporting files and companion videos for this lesson.
Follow along with the transcript
0:00The editable draft
Here is the editable draft built in this walkthrough Rooms openings equipment routes and a matching key We start with an anonymised printed floor plan then use ordinary chat requests and short corrections You will see the real replies and processing waits followed by checks in two and three dimensions
0:22Upload and calibrate the source
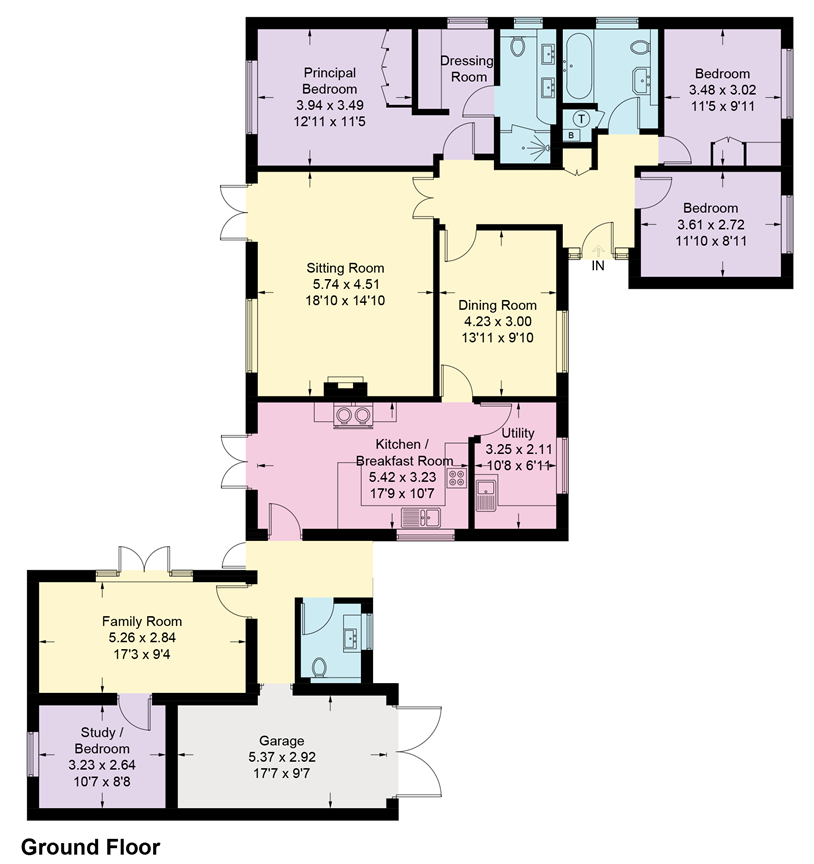
First upload a clean floor plan through chat Remove names addresses and logos before uploading This example keeps the room labels and printed measurements This project still contained the earlier chat test Chat asked me to clear that draft before tracing the image Here I remove those test objects with the editor controls and keep the uploaded plan Set the scale against a known distance Here the sitting room is 4 51 metres across its internal horizontal width The printed plan describes its measurements as approximate so calibration does not turn it into a measured survey Next recorded session: clearing the earlier draft
2:42Build and continue the partial room draft
This early attempt got stuck in repeated clarifications After a service error and retry I asked for a partial draft It created six rooms A chat update was then released before I continued this same drawing The first successful pass created six rooms I kept that drawing and used short follow ups to add the missing areas It reached 14 rooms but the connections still needed checking The failures and corrections are part of this demonstration Chat added the kitchen and retained the six rooms already drawn The new walls differ from the printed measurements Those measurements remain reference values with a visible warning to review the differences The next reply added the principal bedroom dressing room en suite and bathroom It kept their recessed outlines and retained the printed bedroom size as a reference note These room outlines still need checking Next recorded session: Chat update deployed; same drawing retained
11:17Correct a window through Chat
When I asked for a window on the principal bedroom's top wall chat noticed that the visible window was actually on the left I replied yes the left wall window It then added the window and stated its editable draft size
12:39Repair the shared room boundary
Chat moved the family room boundary by about 67 millimetres and joined the matching walls The existing doors and windows were retained This corrects the draft connection It does not verify the printed measurements The next requests could then add the internal doors
13:31Add doors to the connected rooms
CHAT added two internal doors to the family room It used editable 900mm widths and kept the existing outside double door and windows The positions are approximate so they still need checking against the source After joining the kitchen to its neighbouring walls I asked for a 700mm door into the lower hall Chat added it with an editable height and hinge assumption The printed measurements still need review
15:33Add and verify the Bathroom doorway
Here I ask for the bathroom door in ordinary language including its width and the side of the room This is the real request and the original processing time Chat added the 700mm door with an editable 2m height I checked its wall connection and dimensions in the editor The drawing now has 15 doors with all 13 windows retained
17:03Review and visibly undo two doorway placements
Next I ask for the two upper doorways using the printed plan I give an editable example width and ask chat to keep the existing doors and windows Both doors were added but the principal bedroom door is on the vertical side of the recess The source shows a horizontal entrance This needs correcting so I will undo this request and make that position clearer Later recording: undoing the request. Manual review pause omitted. Undo removes both doors added by that request. Earlier work retained: 15 doors and 13 windows.
19:04Adjust the entrance and inspect the slanted return
Chat says the short entrance wall leaves too little room at each end of the door I explicitly allow a small draft adjustment The other openings and the printed dimensions are kept with a note that the changed footprint still needs checking The request adds the 700 millimetre door and moves one entrance corner west but moving only that corner leaves the short return slanted This is why we inspect the result In the next recorded session I use a short follow up to straighten it Reply held for reading
20:24Straighten the return with a short follow-up
The entrance return became slanted when only one corner moved I select the room and ask chat to line up the other end while keeping the new door and the other openings This recording includes the real wait Chat moved the lower corner 164 millimetres west The short return is now vertical and the door remains in place The printed dimensions are still reference values so this is an editable draft awaiting measurement checks Reply held for reading
21:32Doors and an open passage
Next I ask for the N suite door using a 700 millimetre width for this draft Chat adds the door to the left wall and states its assumed height and position It also explains that a direct shared wall to the principal bedroom has not been established That relationship still needs review The next recording adds the front door marked in 900 millimetres wide The assistant assumes a left hinge which still needs checking For the dressing room chat adds the requested doorless passage 900 millimetres wide The existing openings remain in place
24:32Add the illustrative soffit panels
The house is an approximate trace of the printed plan Now I add a separate illustrative arrangement of panels below the eaves using the earlier reference measurements Chat asks where the runs should begin because those measurements do not match this house exactly Three free AIB panels are created Their projection thickness and height are disclosed example dimensions They are not connected to a roof or enclosure The three D inspection exposes a problem Turning a horizontal panel in plan makes the side panels stand upright I preserve this recording and fix the general rotation behaviour The same saved panels will be checked again after that update is released
27:39Sheeting and access chambers
Chat places the three blue sheeting runs Their locations and heights are illustrative and the sheets remain unconnected This is a drawing arrangement not a completed enclosure The airlock and baglock are added next Their first positions overlap the lower rooms so I ask chat to move both west The recording keeps that correction visible Both chambers have moved clear of the house Their catalogue sizes remain unchanged A clear space on the drawing does not establish a sealed connection or verified access
29:54Place the NPU, DCU and van
I ask for the NPU DCU and van by name and describe where they belong Chat asks which sheet to use as a reference so I identify the saved left sheet This keeps the placement tied to the drawing The catalogue equipment is now placed CHAT discloses that its actual NPU and van sizes differ slightly from the earlier reference The duct stays disconnected and the gaps are draft choices rather than verified access or ventilation design
32:24Add and review the smaller equipment
Next come the access tower generator water point foul drainage vacuums and buckets Chat asks for the exact catalogue names where the request is unclear I provide those names and keep the actual catalogue dimensions Eight items have been placed The labels make their sizes visible but the baglock cleaning items overlap the house They need a positional correction which I make through chat rather than hiding a manual repair The baglock vacuum and bucket have now moved west and south The other equipment stays in place These are still free planning symbols with their positions awaiting a practical site review
36:04Vision panels and draft routes
I add four vision panel symbols to the named sheeting runs three along the left and one along the top Their bottom edges are 1 2 metres above ground They remain free symbols without a claimed seal For the routes chat initially says that several styling controls are unavailable I accept automatic draft routes ask for blue and orange where supported and keep the limitations explicit Two labelled routes are created The actual drawing does show blue and orange colours and arrowheads despite the replies wording about arrows The routes cross so this is not verified segregation Next inspect the symbol key and the three D view
39:52Show the matching equipment key
I use the editor view controls to show the key and place it at the bottom right This is a display change and the drawing objects stay as they are The circular vacuum and cleaning equipment symbols have matching entries in the key These describe the equipment placed in this example They are not numbered asbestos survey findings
40:52Check the corrected panel orientation
The earlier three dimensional review exposed a panel orientation bug After the fix was tested and released the same saved panels now lie horizontally No replacement geometry was added The panels and sheeting remain illustrative unconnected objects Their appearance does not verify a sealed enclosure or a safe work method
41:28Keep the plan readable
For a clearer overview I ask to hide the equipment labels while keeping room names and route labels The assistant explains that these equipment objects are outside the context it received and points me to the display controls I followed that guidance in the more menu This native display setting hides equipment names while keeping the symbols and key I have not manually repaired any drawing geometry
43:18Correct the printed reference dimensions
The final check corrects three printed references I ask for the values to change while keeping the existing walls and openings in place Chat updates the dining and utility references It records the upper bedroom values in a separate note The draft warnings remain because reference values do not verify the traced geometry
44:43Review the source and remaining assumptions
The result is an editable draft and the source still matters Printed reference dimensions do not verify the traced wall sizes Review the remaining room relationships opening assumptions and the crossing routes The free panels sheeting and access units are not verified connections or seals This is a software demonstration not an asbestos work method Start with your own plan check its scale ask for manageable changes and inspect the result before relying on it
Was this helpful?
Your feedback helps us improve these instructions.